Monday, October 31, 2011

Frozen Peanut Butter Pie

Last Saturday I had company. Earlier in the week, when I invited said company I decided to make pizza for um...him, and Mom said it would be good to make these peanut butter pies. More on said company sometime...later :)

Anyway, we love peanut butter pies. My grandma used to make these, and I'm not even sure how long ago that's been. We don't make them that often, because this recipe makes four pies, and if we have that much dessert around...well, we eat it. But my company was special and so peanut butter pie it was. He liked it. :D

This isn't health food at all. It's like, the opposite of health food. (junk food, FYI) I usually get four graham cracker crusts, but I wanted to use the little individual crusts...they were so cute!

So here's what you'll need:


I told you it was junk food. You're supposed to have half a gallon of vanilla ice cream, 16 ounces of Cool Whip, and 16 ounces of chunky peanut butter. I didn't have the recipe with me at Walmart and didn't think about the fact that Breyer's is cheesy and cut their containters to only hold 1.5 gallons. I already had the peanut butter on hand, so this is an enormous container. You need either four regular crusts, or 24 small ones.

So first off, the ice cream needs to be soft and the Cool Whip needs to be thawed. Dump the melty ice cream into a large bowl.


Mix in the peanut butter. I just measured out 2 cups. Hehe...yeah, just 2 cups.


Blend it up well...


Add the Cool Whip. I hate Cool Whip. I really do. It's so...fake and chemically. Bleh.


Mix that up well.


Now, you can either scoop this into four graham cracker crusts, or do like I did and use 24 small ones. I just spooned spoonfuls into the crusts, controlling the spoonfuls with my finger. Hah. It was at this time that I got frostbite on my finger.


Now, we always serve our frozen peanut butter pie with Hershey's syrup. It's just what we do. However, I completely forgot to get pictures of the syrup on the pies. I was otherwise eng...I mean, occupied. Take my word for it...we put chocolate syrup on top of our pie.

I was able to take a small fork and work the pies out of their little tin shell thingy, so it worked out really well to have individual ones!

It's yummy. I'm sure you'll love it!

I hope y'all are having a great week! :)

Wednesday, October 26, 2011

Tutorial for Circle Skirt with Ruffle

Originally written and posted June 5, 2010.

After posting the pictures of my newest skirt, the circle with a ruffle, I was asked about the pattern. I rarely use patterns (although I do enjoy experimenting more with them these days!) and I didn’t use a pattern for this skirt…I designed and then made it. There’s probably already some pattern out there that resembles this…personally, I think it’s too obvious a design for there not to be a pattern already! But you don’t need a paper pattern to make this skirt! It’s so simple; all you need is some math skills! And trust me, if I can do the math, so can you!

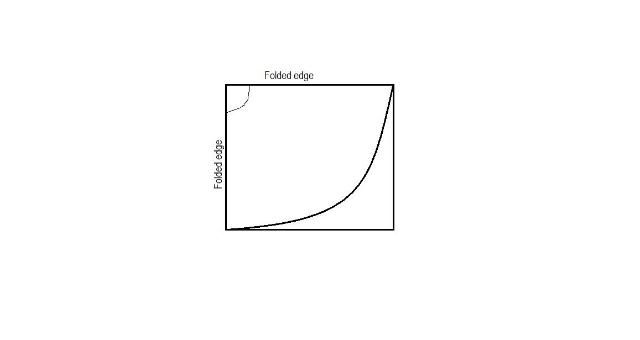
I made a diagram of the cuts that you’ll need to make on the fabric. Sometimes it does make all the difference in the world if you can actually see what I’m talking about! I’ll explain the math, and how you figure out your measurements. Then you can just plug in your numbers and figure your own. Keep in mind, you can’t make this skirt any longer without altering the ruffle’s fullness. When I made this skirt, I wanted to have a ton of ruffles, and I knew it would be long enough, if not quite as long as I would usually like it. It turned out plenty long enough, but if your waist is bigger, and you take up more fabric that way, you can alter the ruffle to make up for the fabric lost in the making of the waist.
Here is the diagram of the cuts. I’ll try to explain it the best I can!

OK..here we go! This piece of fabric is 60 inches wide and 3 yards long. For the circle part, you will go ahead and cut a square off of one end of the fabric, 60 inches long. You’ll then have a piece of fabric left measuring 60 X 48 inches. Put that aside and let’s focus on the circle! Life would be much easier for you if you would fold the large square of fabric into a smaller square. Just fold it twice, in half one way, and then in half the other way. Like…well, you know…just make a smaller square! When you look at this fabric, folded in this way, you’ll only be looking at 1/4 of the circle…just so you don’t go cutting and cutting trying to make it look like a circle right now or anything like that! Now we’ll use some math. You need to find the radius of your waist. It’s not as hard as it sounds! Just get your waist measurment (mine is about 30 inches) and divide that number by 3.14 (so mine is 9.5541401273885350318471337579618 inches…which is SO not on my sewing tape!) and divide THAT number by 2. So if you need a written formula: waist/3.14/2. Waist divided by 3.14, divided by 2. Mine (rounded, of course!) is about 4 1/2 inches. I’ve started cutting a little on the smaller side of my measurment, because the circle you cut for the waist has a tendency to stretch. Ok, so in the top, left hand corner of the smaller, folded square, you need to mark 4 1/2 inches on both sides. You’ll then need to draw an arc connecting the 2 marks, to mark your waist. You can just leave that marked, without cutting it yet, and it will be easier to mark out your hem. I cut the circle as long as possible, so there’s not any measuring to be done for that. If you want to make it shorter, you can change that here. To do that, you’ll need to decided how long you want it, refer to the ruffle section to see how long that part will be, and then adjust this length accordingly. This ended up being 25 1/2 inches long. (the circle part only.) Anyway, if you want to do it the same way I did, here’s how! To make marking the hem a little easier, I tie a marking pencil to one end of a piece of yarn the appropriate length (here it’s 30 inches, measured from the corner, uncut) and tie a knot in the other end of the yarn, through which I stick a pin. Then, I stick the pin (with the yarn attached) through the fabric in the top left corner, and in my case, I also stick it through the carpet, and through the padding underneath the carpet. I don’t have a workspace, so it has to be done in the floor. It works, though, and the pin through all of that holds everything in place! Then, you use the pencil on the other end of the yarn to mark your fabric in that large arc all the way across the fabric. See what we did? We made a compass so your circle would be even! After your 2 arcs are drawn onto your fabric, it should look like this. And hopefully, your arcs will be better than mine…I am horrible at drawing on Paint!!!

Ok, so if you open this baby up, it’ll be a circle! Magic! Well, not really magic, just some math and scissors… However, if you’ll notice, you really won’t be able to get this thing on. (My regular circle skirts are different than this, as they have seams that you can put a zipper in!) That’s pretty unnacceptable, so you’ll need to cut on side of this open. Like so….dotted line is the cut, in case you couldn’t figure that out!!!

Now, you’ll need some sort of waist deal going on. I just put a facing in mine, but you could also sew a waistband on. I think it really depends on the fabric you’re using. To make the facing, all I did was take 2 scraps (from the corner we cut out) and I laid them on top of the waist circle (to get the angle and measuring right,) and cut out the facing. Does that make sense at all? Then I sewed them on, right sides together (2 of the edges of the facing are sewn together, with both open ends where you’ll put the zipper in) and also sewed a line on the facing, through the seam allowance where it was sewn onto the skirt, to keep it from rolling. Well, that’s what it says on the patterns when it tells you to do that… After you get a waist made and attached, you can sew the seam (the one that you cut in the circle) up until the 7 or 9 inches where your zipper will be, and then put the zipper in. If you don’t know about putting zippers in and all, there’s probably other online tutorials dedicated to that…as well as the waistband situation, if you want to Google that. I’m no expert when it comes to those things; usually I decide what kind of waist and closure to use when I work with the fabric.

So now we have a finished circle skirt, just missing the ruffle! If you refer back to the original diagram, You’ll see that remaining 48 inches divided into 4 sections. These are all equal in width, 12 inches each. You need to sew all these together into one enormously long strip. It’s actually 240 inches long, which feels like maybe 2 miles when you’re hemming and gathering it. You’ll see. After these are all sewn together, you need to hem one loooong edge, and put a gathering stitch in the other loooong edge. To make this easier (and since I tend to break gathering stitches, which causes extreme frustration in my case,) I did a new gathering line at each seam, so I had 4 sections. I divided my circle into 4 sections, and pinned a seam of the ruffle at each division. Then I pulled up and adjusted the gathering stitches one section at a time. I pinned it as I went, and went ahead and sewed the ruffle down, when I got to each section division. It was easier to me to do it this way, instead of doing the whole thing at one time. It took forEVER. I’m used to turning out circle skirts in a couple of hours, though, so this probably wasn’t too bad…I am just too impatient when it comes to sewing!

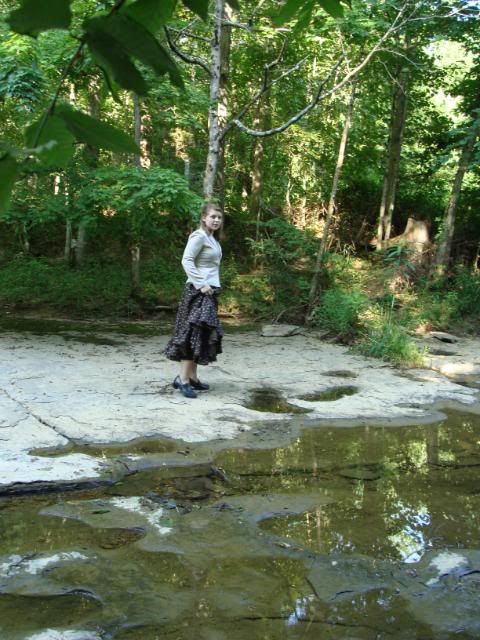
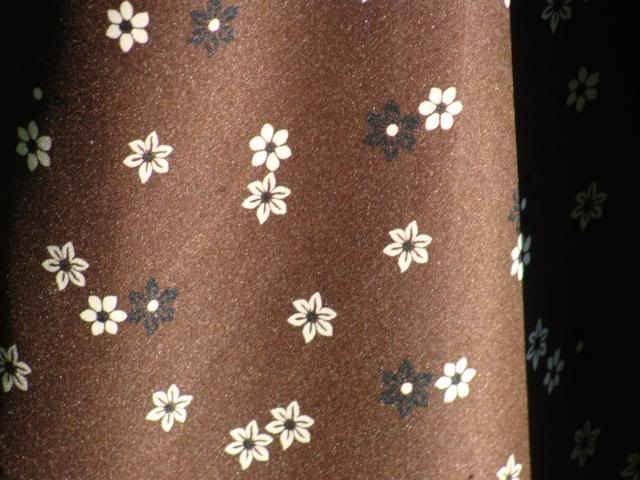
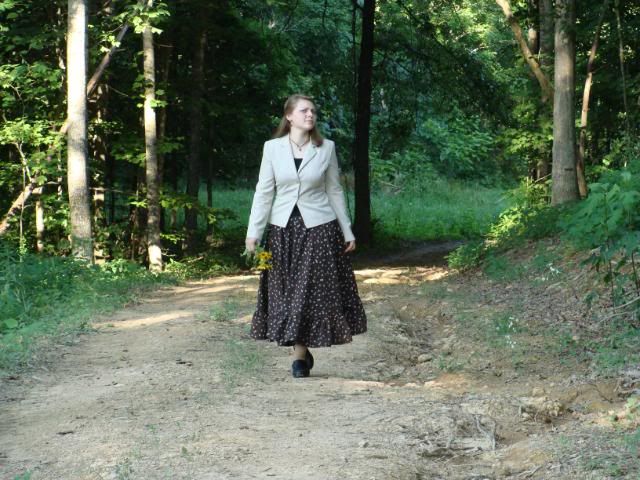
Let me know if you have any questions, or if I forgot to add anything…I’m sure I did! Here’s the finished skirt, which, of course, you’ve already seen! I hope the tutorial is helpful and clear! I’m not used to writing them…yet! :)

And if you missed it, the picture post highlighting can be found here.

~Kayla

Photo Shoot Fun

Originally written and posted June 21, 2010. I was going to post the circle skirt with ruffle tutorial, but it links to this post. So, I'm posting this one first.

I designed and made a new skirt Saturday night, and I actually finished it on Sunday morning, just in time to wear it to church! It’s a circle skirt with a ruffle all the way around. If you want, I can make a tutorial sort of thing…just let me know if y’all want that sometime! I bought this fabric back in December, when we were in Florida. I LOVE the fabric, and I was waiting to have some brilliant design idea to use with it. The brilliant design idea never came, so I stuck with this idea. I think I like it…it combines interesting features, I think. It’s a special fabric, a little shimmery, and pretty fancy. But the design is more of a prairie design. So it combines fancy fabric and old-fashioned design. It’s different..like me! :)

Sunday afternoon, I drug Dave outside to get some pictures of the new skirt. We went down to the creek and I really like a lot of the pictures we got. I will warn you…there are quite a few, and I’m putting most of them up. Just wait until you see the silly ones!

I really like the way it twirls…you won’t see me doing this at church, but it’s fun down at the creek! And can someone please tell me why I look like a peg-leg sailor??? What happened??


“Fine then…I’ll just leave.”


“Ok…I’m coming back.”


I wanted some pictures sitting down in the skirt, but when I tried to sit, Regal thought I wanted to play. Here I am trying to make him calm down, and not grab my shirt and pull me away!


He finally calmed down and sat behind me.

Kayla Custer

Dave said I looked like I smelled something nasty in this one…


At which point I busted out laughing…


And then managed to compose myself enough to get a decent picture… See the initials on the tree? We’d never seen them before…I wonder who did that and how long ago it was?


“I’m going to go sit on that stump over there.”


“Nevermind…there are spiderwebs.”


Close-up of the skirt…

circle skirt with rufle

Ok, I am in LOVE with the lighting in these next few shots! Who here, besides me, thinks that Dave should give up on blacksmithing and go into photography? What do y’all think?

kayla custer

kayla custer

kayla custer

kayla custer

Close-up of the fabric…


kayla custer

A sort of funny face…

kayla custer


Now, I have a really goofy looking smile on right here, but look at the eyes! I was amazed at how something made my eyes pop out like this! Wish I knew what it was…I’d do it more often! Maybe it’s the green behind me?

kayla custer

I really like this one…


“It’s HIS fault!”

kayla custer

He’s bigger than I am…or at least, his head is!


And going back to the house now…


Can you see what a crazy face I’m making here? Dave doesn’t tell me when he’s going to take the pictures…he just sits way in front of me and shoots. Sooo..we end up capturing funny faces sometimes!


And the last one (I know you’re thinking “finally!")


Ok, so I usually don’t get pictures of myself on here, since I’m always the one behind the camera, so this healthy dose should last a while!

What do y’all think?

~Kayla

P.S. Looking back at this now, I'd choose a different skirt design. It's funny how clothing tastes evolve and mature, I guess, over just a year and a half or so. I'd design more of a streamlined, slimmer silhouette for this fabric...would be more flatttering, too. No ruffle, either...the fabric should be highlighted, not so much a fancy design with excessive usage of fabric. :)

Just Stuff

Originally written June 29, 2010...posted July 1st.

So, last Saturday, we went to Owensboro to pick up an anvil for Dave. After driving…and driving…and driving….and driving (before which I’d gotten out of bed at 4:30am. Stinkin’ 4:30AM. There’s a first for everything, though…now I’ve milked a cow before 5AM. It’s not something I’m anxious to repeat.) and driving….we FINALLY got there. I’d already looked online and saw that the ROMP bluegrass festival was going on that very week, so I was slightly miffed about that. We were going all the way to Owensboro during ROMP and I wasn’t getting to go. :( When we got to Owensboro, Dave was telling us where to go, and at every single turn we took, there was a ROMP sign. We were going exactly where the festival was. I mean, the guy’s house was a couple of miles from ROMP! When we finished getting the anvil, I took the one turn that led to ROMP, just so I could maybe get a glimpse of the festival. I drove into the park where it’s held, but you had to go past security to be able to SEE anything, so Dad told the guy that we were just turning around. Yeah…trying to get a glimpse of somebody famous and hear some good music in the process, but we were just turning around. After we turned around, Dave said “yeah, we’re just turning around…and where’s the main stage located? We really thought there was a turn-around at the main-stage…” On the schedule, I’d seen that Dailey and Vincent were going to be there Friday, and Valerie Smith was there Saturday. Beck Buller, who taught the first fiddle workshop I’d ever gone to (before I really started playing at all) was teaching a workshop Saturday afternoon…the Saturday afternoon that I was turning around in the parking lot. When we pulled out of the park, Mom and Dave said that was the best bluegrass festival they had ever been to. Ha ha.

There are a couple festivals that are coming up that I’m excited about, so that helps some. There will be one in Burkesville sometime in September, and Dailey and Vincent will be there. There’s usually a good festival in Russell Springs in August, too. That’s all within 30 minutes or so of the house, so it’s easier for me to go to those. Instead of those where you have to drive….and drive….and drive….and drive….

We did have a good time at some friends’ house Saturday afternoon, so the trip wasn’t bad at all.

We’re leaving Thursday for Gettysburg. I’m sort of excited, I guess… I like going new places, but I’m slightly concerned about the apparent lack of showering facilities. Surely there must be a way..somehow….I hope! A 4 day event in July really needs a place to get cleaned up, I think. My authenticity doesn’t run that deep. In fact, my authenticity doesn’t run ANYWHERE near that deep. On second thought, I don’t even think I have any authenticity. And now I’m going to quit talking about that because that (authenticity) is hard to type. Speaking of …. that…. I have no idea what shoes I’m going to wear. I usually wear my cowboy boots, because you can’t see the shoes underneath the hoop most of the time, but I’ll be wearing the new work dress I ordered. Somehow, I don’t think the cowboy boot underneath is a good idea. Maybe I’ll just go barefoot. But they didn’t have nail polish back then, I guess… Oh, see my predicament? ;)

Dad has been working on a remodeling job for the past several weeks, and Mom has been going with him a lot. So, I’ve been doing little other cooking, cleaning, laundry, and babysitting. I’m behind and have been taking way too long on the leatherwork I’m doing…I’m really not able to work on it at all during the day, so it has to be done after supper, usually. When Mom and Dad come in, they get cleaned up and then they’re ready to eat, so I’ve been having supper ready then. Tonight I’ll try to go over to some friends’ to use their leather sewing machine. I’m really booking it, trying to get a shipment of leather stuff off before we leave. Tomorrow we’ll be packing, and Dad needs some help in the garden, too. I’m experiencing slight feelings of being overwhelmed.

Now I’ve got a batch of cookies coming out of the oven, I need to finish supper, and Mom and Dad will be home soon, so I’ll talk to all y’all later!

~Kayla

Restaurant Critic

Originally written and posted August 1st, 2010.

Sooo…I’ve said before that I could be a restaurant critic, due to my inability to eat a meal out without telling everyone how I would have done it differently! Here I’ve decided to try my hand at it, with the two meals we ate out when we went to Bowling Green, a couple of weeks ago, for Philip to spend the birthday money that was burning a hole in his pocket. When I have that happen, I can just stroll down to the insurance office and take care of that urge, but he isn’t so lucky yet. So we went shopping…Toys-R-Us…whoo hoo!!! (I hate that store…plastic, made-in-china clutter! I told Mom that my kids would not play with plastic toys…wooden is the way to go!)

The first meal was at Olive Garden. I love Italian, and we rarely get it anymore…waaaay out here in the boondocks as we are. The last time I got to eat Italian out was back in April, when Mom and I went to Lexington for our birthdays. We ate at an Olive Garden then, at about 10pm. Carraba’s is my favorite Italian, but Olive Garden would be second.

I got Soup, Salad, and Breadsticks. I love their salad, minus the olives, but my portion did have too much dressing. Can’t really blame that on anyone but my own pirahna-like family, though…I got the last of the bowl! The breadsticks were just absolutely great! I honestly wasn’t looking forward to the breadsticks, because when Mom and I got breadsticks last time, they were cold and hard. That could’ve been because we were there at 10pm, though, because the breadsticks this time were yummy! The soup…I got a bow of the Chicken Gnocchi soup for starters. (Yes, I ate two bowls….I made the most of my visit. Felt awful afterwards, though….) I was excited about getting this soup, because I was looking at making gnocchi a few days beforehand. The soup was good….it was a creamy broth, but a little thin. I like thick, hearty soup, so I guess I’m a little biased. There were only a couple of gnocchies..or whatever the plural of that word is…and just a couple of bites of chicken. So I would have put more stuff in the soup. The second bowl of soup I got was the Italian something-or-other…I forget what it’s called. I wasn’t impressed with that one at all. It was pretty flavor-less, in my opinion. So I would reccommend the Chicken Gnocchi Soup.

The service was pretty good, only the young waiter could’ve used a bigger vocabulary. I guess that’s not on the application….every other word was “awesome.” Awesome should be used sparingly, reserved for, well, awesome, things. Not an answer to “could I have some more tea, please?”

Supper was at Outback Steakhouse. Service was great, there, and we had the most adorable little waitress. (Aren’t you glad I didn’t say that about the guy at Olive Garden???!!!) Ok, so she wasn’t really little…older than me, actually. She was from New Zealand, and told us about her many siblings and parents that she missed. LOVED the accent!

We had to go all out at Outback. We got the Blooming Onion and all. The bread was delicious, and the Blooming Onion still has me puzzled! I think if I tried something like that, I’d end up with a huge blob of fried stuff with an onion tucked way in there somewhere. I’m sure it just wouldn’t work. So, I really enjoyed the onion, and the sauce was really good as well. I ordered Prime Rib, as Dad suggested. I very rarely get steak out, but I figured since we were at a steakhouse, and that happens so rarely, I might as well get a steak! Dad said that Prime Rib was his favorite, and that’s what he was getting. So I ordered Prime Rib, a baked sweet potato, and a Caesar salad. The salad was good, and the sweet potato was good…but nothing extraordinary…just a baked sweet potato. The steak. I ordered my steak medium…I usually get mine medium well, because I don’t like seeing raw meat inside my steak. Dad and Dave ordered medium rare, so I see enough of that across the table while I eat! I ordered it with the 17 original (probably secret) spices and seasonings, and it was described as being a little spicy. It came, and the whole thing looked a bit raw to me. No one bothered telling me that Prime Rib never looks done! So, I was trusting that it really was medium, and not completely raw, which is what it looked like, in my opinion. 17 spices and seasoning? It didn’t taste like it even had salt and pepper on it, to me! I could’ve made it taste more flavorful with 3 spices! (Salt, fresh-ground pepper, and granulated garlic) Imagine what would’ve happened if I had 17!!! After a few bites, I requested some A-1 steak sauce and covered up the pink and red and just ate….trying not to look at it too much!

We also got dessert, which was a huge brownie with ice cream and whipped cream. The brownie was listed as having pecans in it, but tasted more like walnuts, to us. Mom and I ate pretty much the whole thing, as we’re the only ones who like the nuts in our brownies. It was still really, really good, just not what we expected.

All that at Outback, for nearly $100. I could’ve done so much better, with SO much less money! It was Philip’s treat, as the birthday person who wants to go shopping has to take care of expenses incured while doing so, and we always go as a family. When Mom and I go, none of the boys want to go where we go, so she and I just split everything and pay our own expenses. I think it’s nicer that way!

I’ve got to get supper for this hungry crew….Beef Stroganoff and Creamed Spinach….so that’s it for now. Something a little humorous…I’m sitting here at the table writing, and Dad came to wash his hands in the kitchen sink. I had started to boil some water for the spinach, but then rememberd that I was planning on preparing it a different way. So I had set the pot of hot water in the sink. Dad asked what that pot was in the sink, and I replied “some boiling water; I messed up.” Well, Dad didn’t hear that semi-colon, so to him it sounded like “some boiling water I messed up!” I laughed and then clarified, and he said he was wondering if he should ask what went wrong!!!

~Kayla

Monday, October 24, 2011

Chocolate Ice Cream

I made chocolate ice cream one day last week, so I pulled up this old post. Sorry about the awful pictures...I didn't get new ones last week. You get the idea!

Other than last week, I don't remember the last time I made homemade ice cream. Our milk situation isn't quite the same as it used to be, and we usually don't have a lot of extra.

Here we go! This is my first batch of ice cream of the year! We wanted chocolate, so let’s do it!

2 cups of sugar… We are, regrettably, out of the cane sugar that we always use. I am thus reduced to using ordinary white sugar… (I used cane last week)


1 cup of cocoa!


1 Teaspoon of vanilla (or however much you want…like I do here!)


Mix well…


No..I said “mix well!” There…that’s better!


Now, we need 5 cups of milk. Start by adding about 1/2 cup to the dry mix, so that you can mix it smoothly. If you add all the milk at once, the cocoa won’t mix in smoothly, and you’ll have dry clumps of cocoa in your ice cream.


And a little more milk (still pouring from the 5 cups…just a little at a time)


NO!!! We’re out of milk! :(


Ha! Until we go out to the fridge on the porch and get some more… (this picture made me seriously depressed!)


That may be enough. Oh, and that’s Mom’s granola on the middle shelf!
Ok, now we need 3 cups of cream!


I’ll put in the 3 cups of cream, and then add either cream or milk to make the canister 3/4 full.


And that’s it! Now you can fuss with the ice cream freezer that doesn’t want to work right, after 4 months of dormancy. You know, a hypothetical situation. Or not…


Freeze until it’s done!


Yummy! (I wouldn’t know, it’s not like I tried it or anything. The very idea!!! :) )

I transfer it to a bucket and put it in the freezer for a while. Dad likes his ice cream insanely hard, so he doesn’t like it straight out of the ice cream freezer.


Ok, if you need to make sure you’ve got everything, here’s the recipe again…

2 cups sugar
1 cup cocoa
1 tsp vanilla
5 cups milk
3 cups cream


Enjoy!